Equipment
The Scope
When I first showed an interest in Astronomy, my parents bought me a 60 mm refractor with a magnifying power of “450”. Little did I know that its effective magnification was only 140. (Rule of thumb, effective magnification is 60 X aperature in inches) Over the years I dreamed of an 8-inch Schmidt-Cassegrain telescope. My photographer son Brent told me to get an 11-inch scope. I think he was dreaming of a big primary lens! Then I met Dr. J. Moody an Astrophysicist from Brigham Young University. Over dinner one night I told him about my dream telescope and if I should bow to my sons wishes and get the 11 incher. He then pulled out a pen and started to calculate the effective light gathering capabilities of the 8-inch, 11-inch and 14-inch telescope. The results were as follows:
Celestron 8-inch Schmidt-Cassegrain: 843 times the unaided eye. (impressive)
Celestron 11-inch Schmidt-Cassegrain: 1593 times the unaided eye. (awesome)
Celestron 14-inch Schmidt-Cassegrain: 2581 times the unaided eye. (unbelievable)
Celestron 11-inch Schmidt-Cassegrain: 1593 times the unaided eye. (awesome)
Celestron 14-inch Schmidt-Cassegrain: 2581 times the unaided eye. (unbelievable)
He said if you can afford it, get the biggest aperture you can get and make sure to get a good quality German Equatorial Mount, especially if you are doing astrophotography. I was sold and the saving began for the Celestron CGE 1400 FS. The FS stands for FastStar. Celestron made a removable Secondary Mirror which allows for the attaching of a FastStar Lens (HyperStar Lens). This will be explained later in this section. The FS option costs more, but for astrophotography, it was worth it.
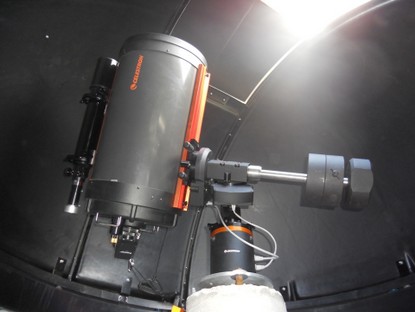
My Dream Scope
Celestron CGE 1400 FS
The CGE Mount
The Celestron German Equatorial (CGE) Mount is an Observatory-class computerized mount and can have a payload weight of 65 pounds. Once the scope is aligned, it is very good at slewing to a desired target and tracking. The Allstar Polar alignment feature is worth its weight in gold. Polar aligning takes only minutes once the scope is accurately aligned. See the Tutorial section on the process involved in Polar Aligning. A picture of the mount is shown below. The three counter weights weigh 25 lbs a piece.
Celestron CGE Equatorial Mount
Feathertouch MicroFocuser
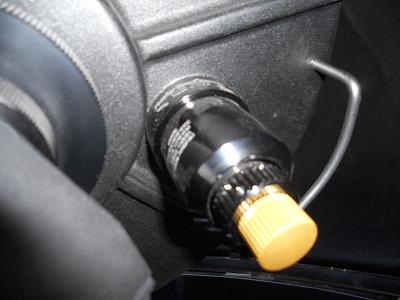
The Feathertouch Microfocuser on the scope visual back
The Guide Scope and Autoguider Camera
In April 2020, I purchased a new ZWO Autoguider camera to replace the StarShoot Autoguider Pro which failed. Pictures of the new camera are shown below.
After dabbling with piggyback astrophotography, I had the urge to use the C 1400 as a prime focus lens for the Nikon DSLR Camera. The learning curve was stiff and I didn't know much about precise polar alignment or autoguiding. The first picture we took was a complete failure. The star trails were “zig zag” patterns. I thought something was wrong with the mount. After much studying, I realized that a “Two Star Alignment with “Calibration Stars” was not the same as a precise Polar Alignment. (See my Tutorial about Polar Alignment) The next set of pictures were better, but I could only take about a 2.5-minute picture without the stars beginning to become oval in shape. Thus, the guide scope was purchased. I purchased the Celestron 80 mm Guide Scope because I like things to match. I also purchased the Orion StarShoot Autoguider Camera. This little camera was reasonably priced and easy to use. It has not failed me yet in finding a guide star. We have been able to take 20-minute exposures displaying completely round stars. Below are pictures of the Celestron 80 mm Guide Scope and the Orion StarShoot Autoguider Camera.
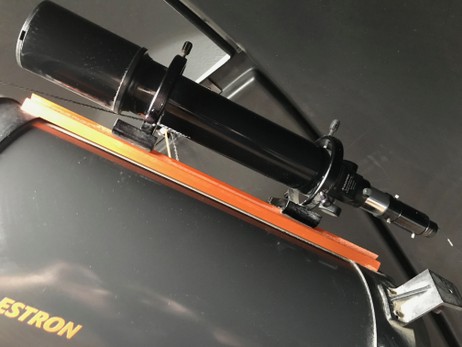
Celestron 80 mm Guide Scope
On January 30, 2016 I received a new autoguider camera. The StarShoot Autoguider Pro is more sensitive and smaller than its predecessor. This camera failed and was replaced with the ZWO Autoguider which attaches to the Guide Scope in the same way as the StarShoot Cameras. The ZWO Autoguider is shown below.
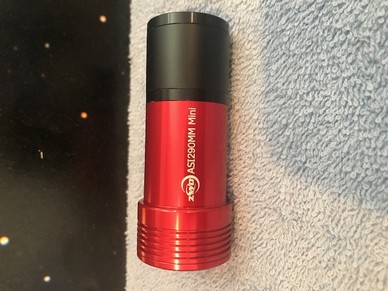
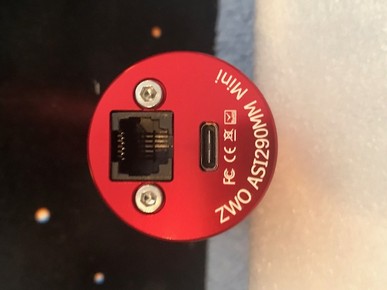
ZWO Autoguider Side and Port View
Eyepieces
For visual observing, the selected eyepiece gives the field of view and the "Power" to the telescope. The CGE 1400 comes with a 40 mm Plossl Eyepiece as standard equipment. For different viewing and power, more eyepieces need to be purchased. The larger the "mm" size, the lower the viewing magnification or power but wider field of view. For viewing planets, small "mm" size gives higher magnification thus more detail. For deep sky objects such as galaxies or nebulas, larger "mm" size, lets in more light and gives a wider field of view. The choice of eyepiece depends on what you are looking at.
The Celestron Corrector / Reducer changes the focal ratio of my scope to f7.1. This gives me a larger field of view and decreases the time I need to expose a given shot by about 4 times. It does give a halo around the object I am photographing, but this can be compensated for by stacking techniques using flats (white/bright background pictures) when the image photos are stacked.
I presently have the following Eyepieces; the magnification is dependent on the Focal Length of the scope that is being used and is representative of my CGE 1400 at a focal length of 3910 mm.
Celestron 40 mm Plossl 1.25-inch barrel. Magnification x 98.
Celestron 19 mm Axiom LX 2-inch barrel Magnification x 206.
Custom Made 85 mm Plossl 2-inch barrel Magnification x 46.
Celestron Corrector / Reducer F/6.3 (f7.1 for my scope)
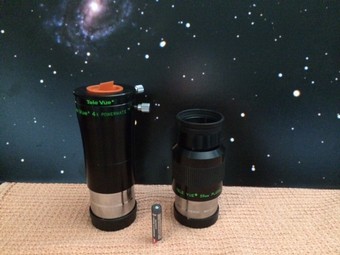
Tele Vue 55 mm 2-inch barrel. Magnification 71
Celestron 19 mm Axiom LX 2-inch barrel Magnification x 206.
Custom Made 85 mm Plossl 2-inch barrel Magnification x 46.
Celestron Corrector / Reducer F/6.3 (f7.1 for my scope)
Tele Vue 55 mm 2-inch barrel. Magnification 71
Tele Vue 2x PowerMate Barlow Lens used for Planetary viewing and imaging.
Tele Vue 4x PowerMate Barlow Lens used for Planetary viewing and imaging.
The Tele Vue lens replaces the 85 mm lens and is now my lens of choice when having a group viewing session.

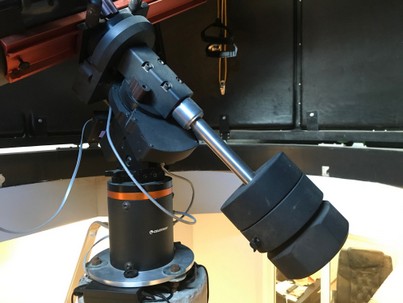
HyperStar Lens
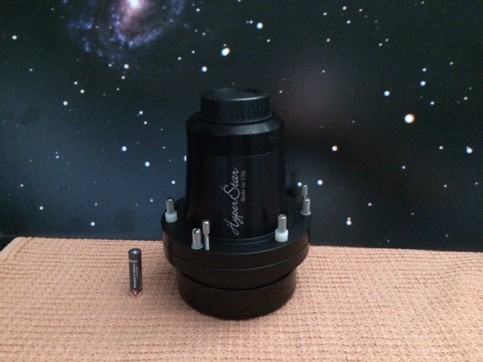
The HyperStar lens shown above will give me a 14-inch, f/1.9, 675mm imaging machine. With this I can get incredible pictures in a short period of time and a wide angle.
Imaging Camera
Four things are essential for good astrophotography. A good Equatorial Mount, the imaging scope, the guide scope, and the imaging camera. I have talked about the scopes and mount above. Here I talk about the camera. I am presently using the full frame Nikon 810A camera specifically produced by Nikon for Astrophotography. The camera at full FX mode is 36 megapixels and has an effective ISO of 6400 ISO and can range up to 12800 ISO. This camera can be used without the need for "Stacking" pictures with specialized software. I still stack pictures to reduce some noise and it allows me to use “Flat Frames” which eliminates dark edges on photos. The Nikon uses internal noise reduction techniques and therefore using it is more like using a traditional camera for landscape pictures. You set the ISO or "Film Speed", for lack of a better descriptive term, and the shutter duration. It is effectively noiseless at 6400 and below. I started out with the Nikon D3 camera then the D5200 and finally settled on the 810A. I have been extremely pleased with this camera.
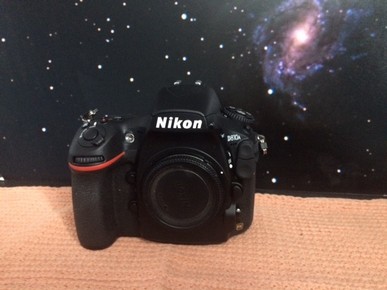
Nikon D810A Astrophotography Camera
Hand Controller Extension
When it is cold during the winter months, the Celestron Hand Controller display becomes very sluggish. Therefore I purchased 25 feet of 6 conductor Line Cable with RG 25 connectors and ran the cable directly into the warm room. This way I can center the scope or use Precise GO TO from the comfort of my computer chair. With Live View activated from my Camera, I can see what the scope is pointing at. It will only be used when I am taking pictures. For visual use, I will connect the Hand Controller directly to the scope. I know I could have used NexRemote and it works well, but it causes a conflict with Stellarium when both are used simultaneously. One thing to note if an extension is used, it that the 6 conductors and their colors need to match up and not be rolled.
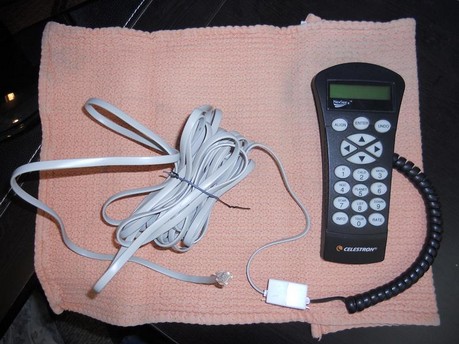
25-feet of cable and a coupler to connect the Controller from the Warm Room.
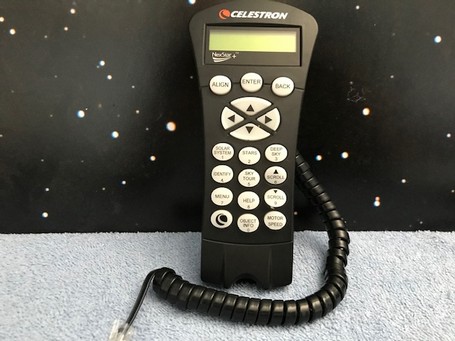
New Celestron NexStar+ Hand Controller (Similar to the one above only newer)
Micro Touch Auto Focuser
I purchased the Micro Touch Auto Focuser from Starizona (Starizona.com). This device will allow me to focus the telescope through the computer from the warm room. It will allow me to focus the scope either manually using the "In" or "Out" buttons. It can also be used automatically to focus the camera through a computer. I purchased the wireless version so that I will not be tethered to the remote unit while in the warm room.
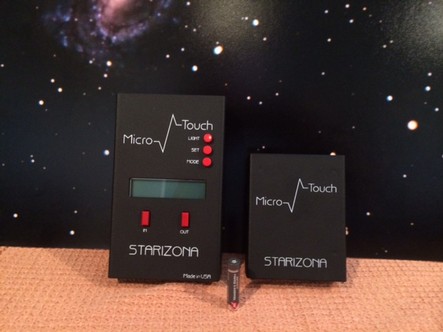
On the left is the Focuser Hand Controller. On the right is the remote unit which controls the focusing motor. An "AAA" battery is used to give scale to the image.
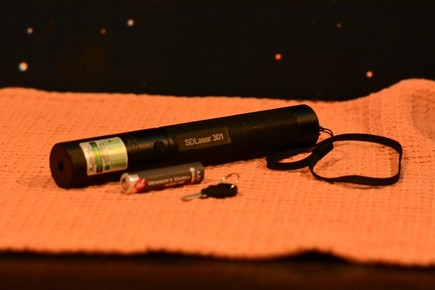
Astronomy Pointing Laser
To aid in pointing out Constellations, Planets and Stars, I purchased a 5 mW Laser. This laser did the job, but it was not bright enough and kept fading until it was no better than a presentation pointer. Therefore, I purchased a 500 mW Laser for astronomy purposes. This laser was purchased from Laserpointerpro.com. The laser has a strong green laser that can be seen very well with large groups when pointing at celestial objects. This is a powerful laser and it has a key to keep it safe when children are around. I keep the key locked up in another drawer from the laser. So far I have been very satisfied with the laser. If someone is thinking of purchasing a laser from Laserprinterpro.com, the price is right, but the shipping took almost 3 weeks. The web site said 6 to 8 days, but it was much longer. If you have the patience to wait, then this is a good place to purchase a laser. They have a huge selection. A picture is shown below. The AAA battery is shown for scale only. The actual laser comes with a Li battery and charger.
Software
For controlling the scope, camera, and guide scope I use the following software:
Stellarium: This is used for Scope Control from a computer. It can be downloaded from stellarium.org. This software is excellent for guided tours from a computer and gives a great representation of the night sky. It can control the telescope and help to determine the nights targets. Best of all, it is free!!
Nikon Camera Control/ NX2 and NXD: This software controls the Nikon Cameras from a computer. The ISO settings and "Live View" of what the camera is seeing can be displayed on the computer monitor. I use it every time I take astrophotographs. Along with this software is bundled Nikon NX Viewer. This software allows for cataloging and viewing the nights astrophotographing sessions. This software costs approximately $150 and can be purchased from Amazon. The NX 2 and NXD are additional software used to post process the images. NX2 is the older version of NXD.
PHD2 Guiding: This software can be downloaded at Open PHD Guiding. This is great software for autoguiding the scope for long exposures. The web site has good tutorials and it is free. Consider donating if you use this software in order to keep updates coming.
Astronomy Exposure Calculator: This program is actually an Exposure Calculator in Excel. It was developed by my son Brent Smith to allow for proper exposures at different f/numbers, ISO, and shutter speed. For example, when we shoot a Galaxy, we set the camera ISO at 25600 and shoot for 30 seconds. We look at the exposure, then plug it into the Excel Exposure Calculator. The same shot at 1200 ISO would take approximately 10 minutes. If you would like the calculator, send me an Email. The address is under the "Contact Us" section.
Nikon Capture NX 2: This is the post processing software that I use to "Clean Up" my astrophotographs. This software has special abilities unique to the Nikon camera line that I use. It can also be used on other photographs. The cost is around $150.
Nikon Capture NXD: This is the update to NX2. I still prefer NX2, but I have used both.
Deep Sky Stacker: This is the software that I use when I do stacking to reduce noise in the photographs. It is free and does the job very well. It can be downloaded here.
ImagesPlus 6.5: I purchased this software essentially to replace the Deep Sky Stacker program mentioned above. The Deep Sky Stacker software served me well until I started using the Nikon D810A cameras. With this camera, the Deep Sky program would not stack the RAW Nikon NEF files. I assume they were too big. The ImagesPlus software not only stacks the NEF files but I use it with my Nikon Capture NX2 and NXD software for post processing. The ImagesPlus Software costs about $245.00. This software is downloaded from www.mlunsold.com.